
How to replicate Tom Scott's 'This video has X views' video with Node.js and YouTube Data API
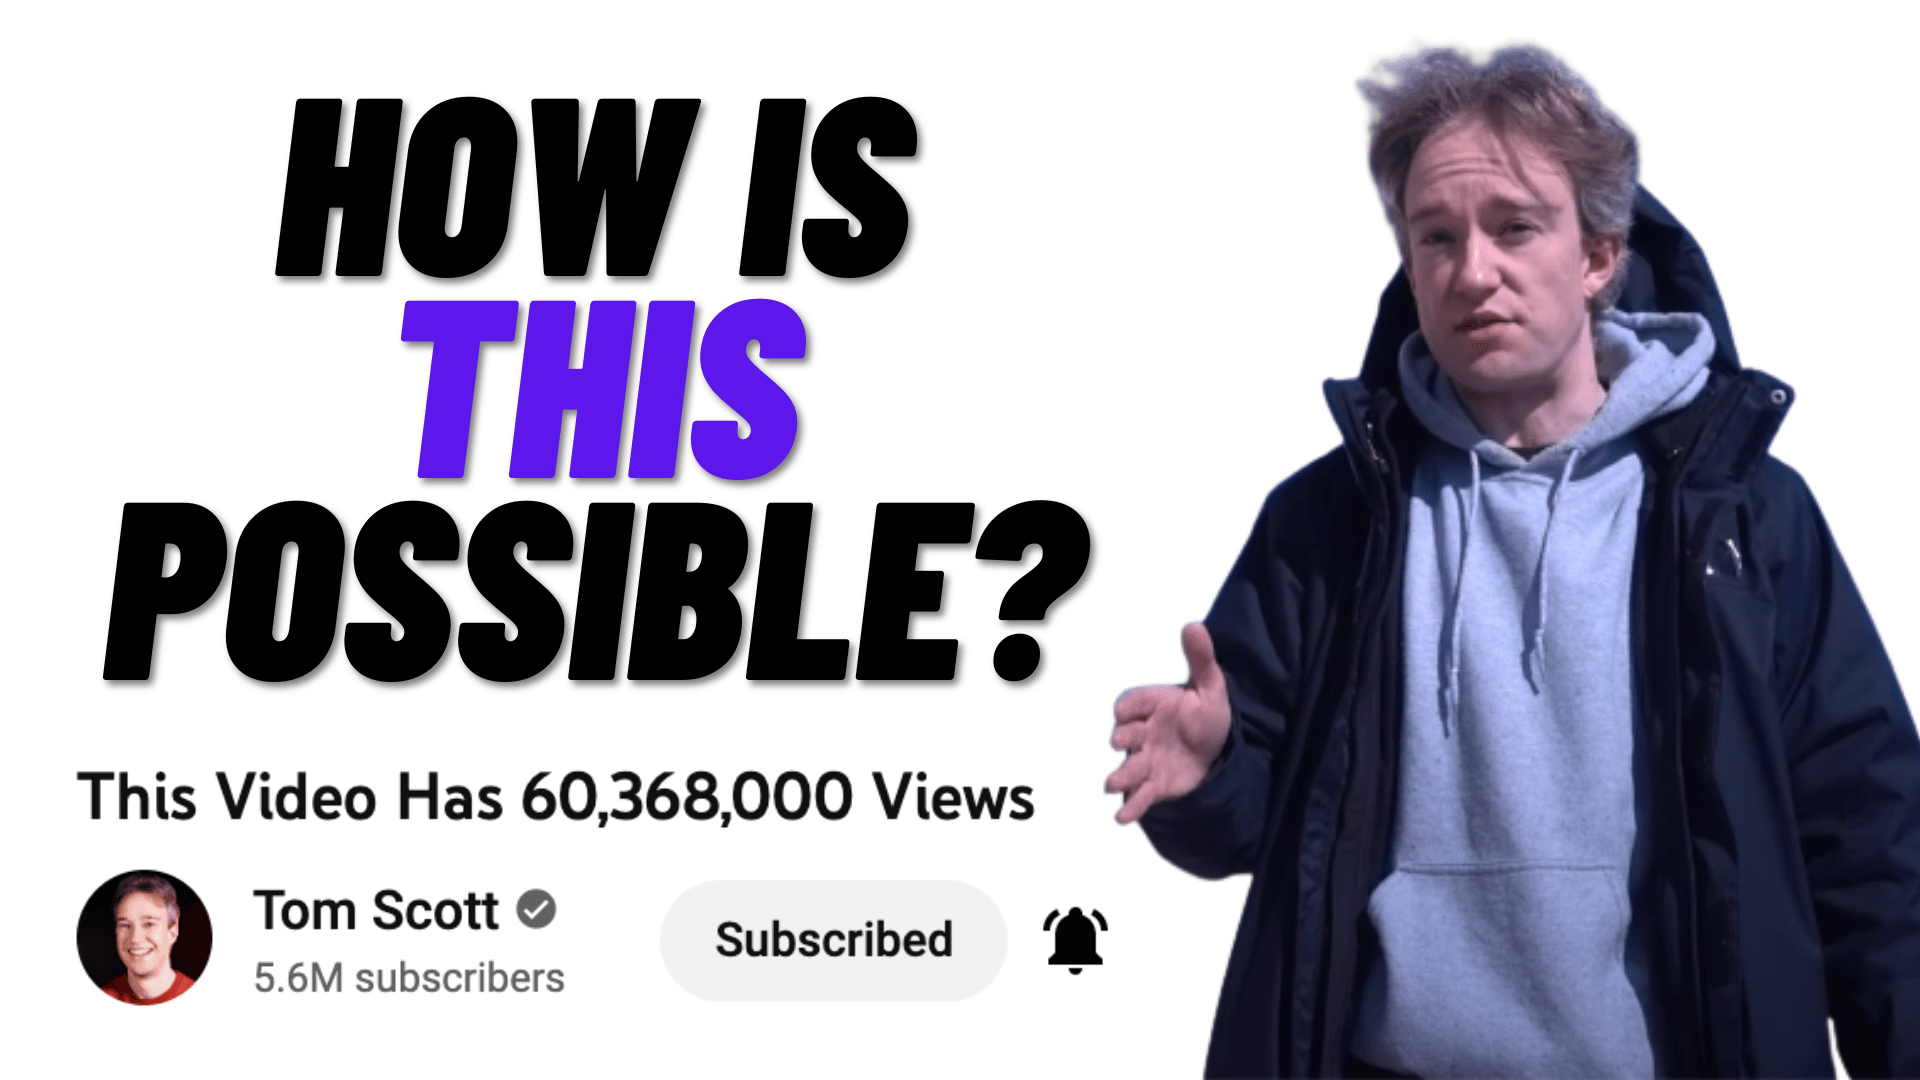
Have you seen this video by Tom Scott?. It's a video by Tom Scott, where the title of the video tells you how many views the video has. Mind blowing!
How is this possible? Well over the last couple of days, I have been on a journey to find out. I figured out that Tom would have made an application, possibly with Nodejs, and connected it with the YouTube Data API to periodically search for the video's stats, and then update them. I ended up making my own video which behaves very similar. Here is how I did it.
Table of contents
- Step 1: Create OAuth tokens in Google Cloud
- Step 2: Install Node
- Step 3: Create a new node app and install dependencies
- Step 4: Create a .env file
- Step 5: Generate an Auth URL
- Step 6: Generate a refresh token
- Step 7: Call the YouTube Data API
- Step 8: Add a Cron job
- Step 9: Add express
Step 1: Create OAuth tokens in Google Cloud
YouTube is owned by Google. There is a central location to sign up for all APIs Google offers, including the YouTube Data API. It is called Google Cloud. Because generating OAuth tokens is quite a lengthy process, I have created another blog post with this process. Do that and then go on to Step 2.
Step 2: Install Node
I am assuming you have Node installed. If not, you will need to install it.
If you are not sure if you have Node installed, simply run the following in your terminal
node -v
It should say something like
v16.14.2
Step 3: Create a new node app and install dependencies
Let's go ahead a create a new Node.js app with
npm init -y
This will create our package.json file for us. We will now add all the packages we will need for our bot.
npm install googleapis
npm install dotenv
npm install cron
npm install express
Step 4: Create a .env file
As we are using sensitive keys and tokens in our application, we will store them in a .env file. Put in the CLIENT_ID, CLIENT_SECRET and REDIRECT_URI, which were generated in Step 1.
CLIENT_ID="387632578954-rk2mh4gvg40qh3s7ta5nbpu7e8bm6uam.apps.googleusercontent.com"
CLIENT_SECRET="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"

REDIRECT_URI="http://localhost:3000/callback"
Note: These keys are sensitve information and I will revoke these before the video/article goes live.
Step 5: Generate an Auth URL
Before we can start using the API, Google needs permission by the account that requested access.
Go ahead and generate a file called auth.js and add the following code.
const { google } = require("googleapis");
require("dotenv").config();

const oauth2Client = new google.auth.OAuth2(
  process.env.CLIENT_ID,
  process.env.CLIENT_SECRET,
  process.env.REDIRECT_URI
);

const generateAuthUrl = async () => {
  const scopes = [
    "https://www.googleapis.com/auth/youtube",
  ];

  const url = await oauth2Client.generateAuthUrl({
    access_type: "offline",
    scope: scopes,
  });

  console.log(url);
};

generateAuthUrl();
Basically, we are creating a client, and generating an AuthUrl which we can then navigate to. Run this application with node auth.js and your console should print out a URL that you can navigate to. Click on it and you should be brought to a screen like this.

I run a game called WhereTaken, and I'll be using that email for this example, this is also the email that I added as a test user when generating the OAuth tokens. Follow along the steps and give access to this app. It will eventually redirect you to your REDIRECT_URI, in our case `http://localhost:3000/callback.
In the URL that you have been redirected to, you will notice that there is a code in the query string
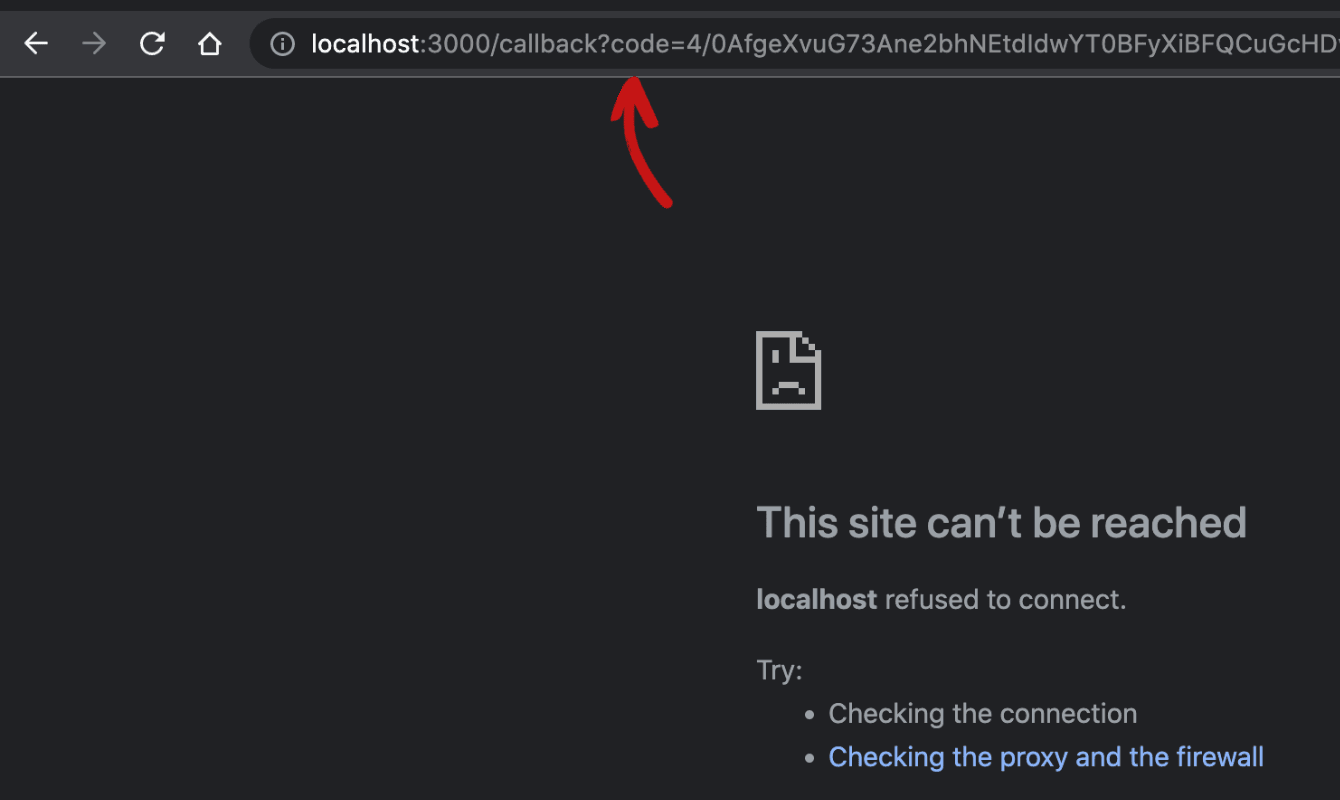
We need to extract that code from the URL as we will need it to create a refresh token.
I used the URL parser tool on freeformatter.com. It extracted the code from the URL, here it is
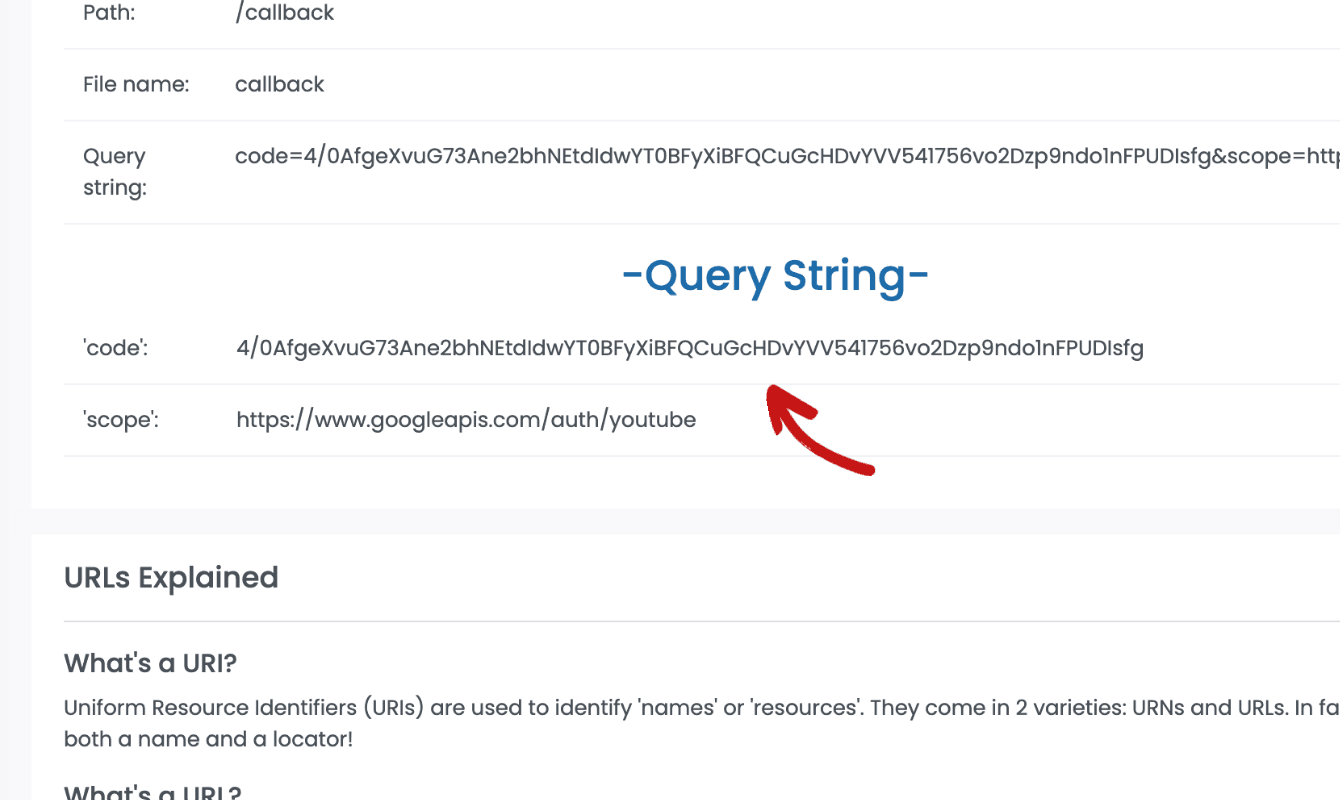
Save this code somewhere as we need it in the next step.
Step 6: Generate a refresh token
With the code from Step 4, we can create a set of tokens, one of these being a Refresh Token. Basically, whenever we want to use the API, we need to create an Access Token. How do we do that? We do it with our Client ID, Client Secret and Refresh Token.
Create a file called refresh.js and add the following code
const { google } = require("googleapis");
require("dotenv").config();

const oauth2Client = new google.auth.OAuth2(
  process.env.CLIENT_ID,
  process.env.CLIENT_SECRET,
  process.env.REDIRECT
);

const getTokens = async () => {
  const res = await oauth2Client.getToken(
    "4/0Af90PXvutvmRviuP6d8H3lPkGkgRTWBDGiKKcQA9xg_ireF4H1NGoywlb_Bwc7NwbVxM0Og"
  );
  console.log(res.tokens);
};

getTokens();
We are going to call the getToken method, which will return an access_token and a refresh_token. We only need the refresh_token. Copy the refresh_token into a new environment variable called REFRESH_TOKEN.
Your .env file should now look something like this.
CLIENT_ID="387632578954-rk2mh4gvg40qh3s7ta5nbpu7e8bm6uam.apps.googleusercontent.com"
CLIENT_SECRET="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"
REFRESH_TOKEN="1//0g7LW-gz-TVGrCgYIARAAGBASNwF-L9IrvdjjIio5xkDTP_T3UPIcb2H9uB0k453_SIWNaY_7-p6XBVJkR5JdN6yZriOr16YF8_g"
Step 7: Call the YouTube Data API
It is time to call the API!
The first thing we need to do is search for the video, that way we can extract the amount of views that this video has. Then we can go ahead and update the video. Create a file called index.js and paste the following code
const { google } = require("googleapis");
require("dotenv").config();

const oauth2Client = new google.auth.OAuth2(
  process.env.CLIENT_ID,
  process.env.CLIENT_SECRET,
  process.env.REDIRECT
);

const updateVideo = async () => {
  oauth2Client.setCredentials({ refresh_token: process.env.REFRESH_TOKEN });

  // YouTube client
  const youtube = google.youtube({
    version: "v3",
    auth: oauth2Client,
  });

  try {
    // Get video
    const result = await youtube.videos.list({
      id: "lhjiIZCJcOc", // <-- ID of video
      part: "statistics,snippet",
    });

    if (result.data.items.length > 0) {
      const stats = result.data.items[0].statistics;

      // Update the video
      await youtube.videos.update({
        part: "snippet",
        requestBody: {
          id: "lhjiIZCJcOc",
          snippet: {
            title: `This video has ${stats.viewCount} views`,
            categoryId: 28,
          },
        },
      });
    }
  } catch (error) {
    console.log(error);
  }
};

updateVideo();
Now you can go back to your video and see if the title has been updated. If you did all these steps right it should be!
Step 8: Add a Cron job
We want to run the updateVideo function every 8 minutes. I chose 8 minutes as there is a limit of 10000 requests per day using the YouTube Data API and updating a video costs 50 API credits.
We can easily achieve this with cron jobs.
Here is an updated code snippet with the cron job added.
const { google } = require("googleapis");
require("dotenv").config();
const CronJob = require("cron").CronJob;

const oauth2Client = new google.auth.OAuth2(
  process.env.CLIENT_ID,
  process.env.CLIENT_SECRET,
  process.env.REDIRECT
);

const updateVideo = async () => {
  oauth2Client.setCredentials({ refresh_token: process.env.REFRESH_TOKEN });

  // YouTube client
  const youtube = google.youtube({
    version: "v3",
    auth: oauth2Client,
  });

  try {
    // Get video
    const result = await youtube.videos.list({
      id: "lhjiIZCJcOc", // <-- ID of video
      part: "statistics,snippet",
    });

    if (result.data.items.length > 0) {
      const stats = result.data.items[0].statistics;

      await youtube.videos.update({
        part: "snippet",
        requestBody: {
          id: "lhjiIZCJcOc",
          snippet: {
            title: `This video has ${stats.viewCount} views`,
            categoryId: 28,
          },
        },
      });
    }
  } catch (error) {
    console.log(error);
  }
};

const updateEvery8Mins = new CronJob("*/8 * * * * *", async () => {
  updateVideo();
});

updateEvery8Mins.start();
Step 9: Add express
If you want to host this application on a hosting platform like heroku, you will need to add express to your node.js app. This is because when hosting node.js applications, they need a process to attach to.
To do that, simply add the following to your index.js file.
const express = require('express')
const app = express()
const port = process.env.PORT || 4000;

app.listen(port, () => {
  console.log(`Listening on port ${port}`)
})
Your final `index.js file should look like this
const { google } = require("googleapis");
require("dotenv").config();
const CronJob = require("cron").CronJob;

const express = require("express");
const app = express();
const port = process.env.PORT || 4000;

app.listen(port, () => {
  console.log(`Listening on port ${port}`);
});

const oauth2Client = new google.auth.OAuth2(
  process.env.CLIENT_ID,
  process.env.CLIENT_SECRET,
  process.env.REDIRECT
);

const updateVideo = async () => {
  oauth2Client.setCredentials({ refresh_token: process.env.REFRESH_TOKEN });

  // YouTube client
  const youtube = google.youtube({
    version: "v3",
    auth: oauth2Client,
  });

  try {
    // Get video
    const result = await youtube.videos.list({
      id: "lhjiIZCJcOc", // <-- ID of video
      part: "statistics,snippet",
    });

    if (result.data.items.length > 0) {
      const stats = result.data.items[0].statistics;

      await youtube.videos.update({
        part: "snippet",
        requestBody: {
          id: "lhjiIZCJcOc",
          snippet: {
            title: `This video has ${stats.viewCount} views`,
            categoryId: 28,
          },
        },
      });
    }
  } catch (error) {
    console.log(error);
  }
};

const updateEvery8Mins = new CronJob("*/8 * * * * *", async () => {
  updateVideo();
});

updateEvery8Mins.start();
And that is it, your application to update the title of a YouTube video with the amount of views is complete. All that is left to do now is host your application on your favourite hosting platform and watch the views go up!


About the Author
Open for work
Hi, I'm Ryan from Adelaide, South Australia.
I'm a web developer and computer science tutor. I also rock climb, play wheelchair basketball and brew beer.
Check out some of the games I made


Smug Chicken
The daily AI art word game.

Searchle
How does google autocomplete this search?

WhereTaken
Guess the country from a photo.

Retro Snake
Eat the food but don't hit the walls or your own body!